Video Generation Using Diffusers
LTX Pipelines for Video Generation
LTX-Video and the LTX-2 family are DiT-based video generation models capable of generating high-quality videos from text prompts or conditioning images.
Text-to-Video Pipeline
The text-to-video pipeline turns a text prompt into a sequence of video frames:
- Prompt → tokens: the prompt is tokenized (and padded to the model’s max length).
- Tokens → text embeddings: a text encoder produces embeddings used to condition generation.
- Denoising loop: a Transformer predicts and refines video latents over multiple steps, while the scheduler controls the noise level at each step.
- Latents → frames: the final latents are decoded into RGB video frames.
Image-to-Video Pipeline
The image-to-video pipeline extends the text-to-video workflow with image conditioning:
- Image → latents: the conditioning image is VAE-encoded into latent space and used to anchor frame 0.
- Prompt + image embeddings → denoising: the Transformer generates video latents conditioned on both the text prompt and the encoded image.
- Latents → frames: the final latents are decoded into RGB video frames, with the first frame matching the input image.
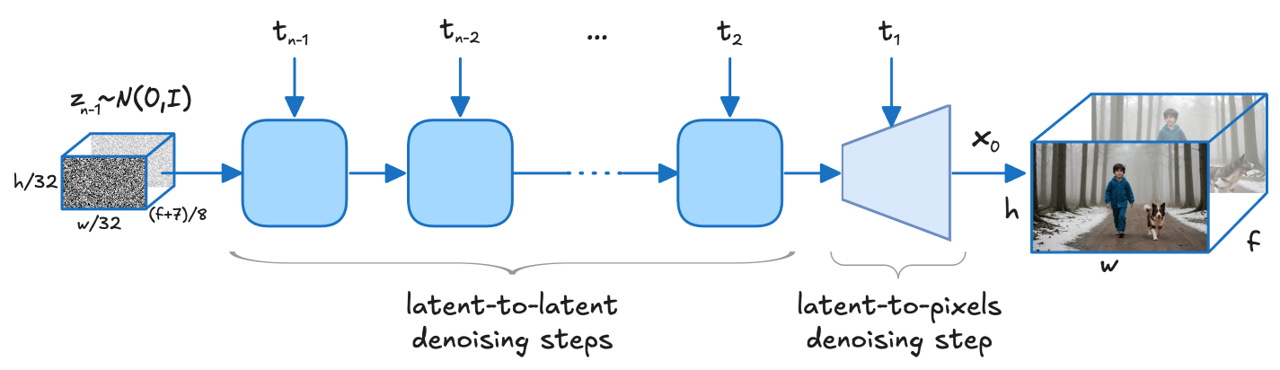 Source: arXiv:2501.00103
LTX-2 and LTX-2.3
The LTX-2 family extends the text-to-video workflow with a synchronized audio track: alongside the video latents, the Transformer denoises audio latents that are decoded by a separate audio VAE and vocoder. Text2VideoPipeline returns the waveform in audio and its rate in audio_sample_rate.
LTX-2.3 refines the guidance used in the denoising loop, trading compute for quality: in addition to classifier-free guidance, it runs a Spatio-Temporal Guidance pass and a modality isolation pass per step. The pipeline reads its defaults from the converted model, so LTX-2.3 reproduces the reference behavior out of the box. See Additional Usage Options to tune or disable these terms.
Convert and Optimize Model
Download and convert LTX model Lightricks/LTX-Video to OpenVINO format from Hugging Face.
For text-to-video:
optimum-cli export openvino --model Lightricks/LTX-Video --weight-format int8 --task text-to-video --trust-remote-code LTX_Video_ov
For image-to-video (includes VAE encoder):
optimum-cli export openvino --model Lightricks/LTX-Video --weight-format fp32 --task image-to-video --trust-remote-code LTX_Video_i2v_ov
For LTX-2.3 (text-to-video with audio):
optimum-cli export openvino --model diffusers/LTX-2.3-Diffusers --weight-format int8 --task text-to-video --trust-remote-code LTX_2_3_ov
Refer to the Model Preparation guide for detailed instructions on how to download, convert and optimize models for OpenVINO GenAI.
Run Model Using OpenVINO GenAI
OpenVINO GenAI supports the following video generation pipelines:
Text2VideoPipelinefor creating videos from text prompts.Image2VideoPipelinefor creating videos conditioned on an input image and text prompt.
Text to Video
- Python
- C++
- CPU
- GPU
import openvino_genai as ov_genai
import cv2

def save_video(filename: str, video_tensor, fps: int = 25):
  batch_size, num_frames, height, width, _ = video_tensor.shape
  video_data = video_tensor.data

  for b in range(batch_size):
      if batch_size == 1:
          output_path = filename
      else:
          base, ext = filename.rsplit(".", 1) if "." in filename else (filename, "avi")
          output_path = f"{base}_b{b}.{ext}"

      fourcc = cv2.VideoWriter_fourcc(*"MJPG")
      writer = cv2.VideoWriter(output_path, fourcc, fps, (width, height))

      for f in range(num_frames):
          frame_bgr = cv2.cvtColor(video_data[b, f], cv2.COLOR_RGB2BGR)
          writer.write(frame_bgr)

      writer.release()
      print(f"Wrote {output_path} ({num_frames} frames, {width}x{height} @ {fps} fps)")


model_path = "path/to/model"  # Path to the model directory
prompt = "your video generation prompt"

pipe = ov_genai.Text2VideoPipeline(model_path, "CPU")
video = pipe.generate(prompt).video

save_video("genai_video.avi", video)
import openvino_genai as ov_genai
import cv2

def save_video(filename: str, video_tensor, fps: int = 25):
  batch_size, num_frames, height, width, _ = video_tensor.shape
  video_data = video_tensor.data

  for b in range(batch_size):
      if batch_size == 1:
          output_path = filename
      else:
          base, ext = filename.rsplit(".", 1) if "." in filename else (filename, "avi")
          output_path = f"{base}_b{b}.{ext}"

      fourcc = cv2.VideoWriter_fourcc(*"MJPG")
      writer = cv2.VideoWriter(output_path, fourcc, fps, (width, height))

      for f in range(num_frames):
          frame_bgr = cv2.cvtColor(video_data[b, f], cv2.COLOR_RGB2BGR)
          writer.write(frame_bgr)

      writer.release()
      print(f"Wrote {output_path} ({num_frames} frames, {width}x{height} @ {fps} fps)")


model_path = "path/to/model"  # Path to the model directory
prompt = "your video generation prompt"

pipe = ov_genai.Text2VideoPipeline(model_path, "GPU")
video = pipe.generate(prompt).video

save_video("genai_video.avi", video)
- CPU
- GPU
#include "openvino/genai/video_generation/text2video_pipeline.hpp"
#include "imwrite_video.hpp"

int main(int argc, char* argv[]) {
  const std::string models_path = argv[1], prompt = argv[2];

  ov::genai::Text2VideoPipeline pipe(models_path, "CPU");
  ov::Tensor video = pipe.generate(prompt).video;

  save_video("genai_video.avi", video);
}
#include "openvino/genai/video_generation/text2video_pipeline.hpp"
#include "imwrite_video.hpp"

int main(int argc, char* argv[]) {
  const std::string models_path = argv[1], prompt = argv[2];

  ov::genai::Text2VideoPipeline pipe(models_path, "GPU");
  ov::Tensor video = pipe.generate(prompt).video;

  save_video("genai_video.avi", video);
}
Image to Video
The Image2VideoPipeline requires a model exported with optimum-intel from the main branch.
- Python
- C++
- CPU
- GPU
import openvino_genai as ov_genai
import openvino as ov
import numpy as np
import cv2

def load_image(image_path: str) -> ov.Tensor:
  img = cv2.cvtColor(cv2.imread(image_path), cv2.COLOR_BGR2RGB)
  return ov.Tensor(img[np.newaxis])  # [1, H, W, 3] uint8

def save_video(filename: str, video_tensor, fps: int = 25):
  batch_size, num_frames, height, width, _ = video_tensor.shape
  video_data = video_tensor.data

  for b in range(batch_size):
      if batch_size == 1:
          output_path = filename
      else:
          base, ext = filename.rsplit(".", 1) if "." in filename else (filename, "avi")
          output_path = f"{base}_b{b}.{ext}"

      fourcc = cv2.VideoWriter_fourcc(*"MJPG")
      writer = cv2.VideoWriter(output_path, fourcc, fps, (width, height))

      for f in range(num_frames):
          frame_bgr = cv2.cvtColor(video_data[b, f], cv2.COLOR_RGB2BGR)
          writer.write(frame_bgr)

      writer.release()
      print(f"Wrote {output_path} ({num_frames} frames, {width}x{height} @ {fps} fps)")


model_path = "path/to/model"   # Path to the model directory
image_path = "path/to/image.png"  # Path to the conditioning image
prompt = "your video generation prompt"

image = load_image(image_path)
pipe = ov_genai.Image2VideoPipeline(model_path, "CPU")
video = pipe.generate(image, prompt).video

save_video("genai_video.avi", video)
import openvino_genai as ov_genai
import openvino as ov
import numpy as np
import cv2

def load_image(image_path: str) -> ov.Tensor:
  img = cv2.cvtColor(cv2.imread(image_path), cv2.COLOR_BGR2RGB)
  return ov.Tensor(img[np.newaxis])  # [1, H, W, 3] uint8

def save_video(filename: str, video_tensor, fps: int = 25):
  batch_size, num_frames, height, width, _ = video_tensor.shape
  video_data = video_tensor.data

  for b in range(batch_size):
      if batch_size == 1:
          output_path = filename
      else:
          base, ext = filename.rsplit(".", 1) if "." in filename else (filename, "avi")
          output_path = f"{base}_b{b}.{ext}"

      fourcc = cv2.VideoWriter_fourcc(*"MJPG")
      writer = cv2.VideoWriter(output_path, fourcc, fps, (width, height))

      for f in range(num_frames):
          frame_bgr = cv2.cvtColor(video_data[b, f], cv2.COLOR_RGB2BGR)
          writer.write(frame_bgr)

      writer.release()
      print(f"Wrote {output_path} ({num_frames} frames, {width}x{height} @ {fps} fps)")


model_path = "path/to/model"   # Path to the model directory
image_path = "path/to/image.png"  # Path to the conditioning image
prompt = "your video generation prompt"

image = load_image(image_path)
pipe = ov_genai.Image2VideoPipeline(model_path, "GPU")
video = pipe.generate(image, prompt).video

save_video("genai_video.avi", video)
- CPU
- GPU
#include "openvino/genai/video_generation/image2video_pipeline.hpp"
#include "load_image.hpp"
#include "imwrite_video.hpp"

int main(int argc, char* argv[]) {
  const std::string models_path = argv[1];
  const std::string image_path = argv[2], prompt = argv[3];

  ov::Tensor image = utils::load_image(image_path);

  ov::genai::Image2VideoPipeline pipe(models_path, "CPU");
  ov::Tensor video = pipe.generate(image, prompt).video;

  save_video("genai_video.avi", video);
}
#include "openvino/genai/video_generation/image2video_pipeline.hpp"
#include "load_image.hpp"
#include "imwrite_video.hpp"

int main(int argc, char* argv[]) {
  const std::string models_path = argv[1];
  const std::string image_path = argv[2], prompt = argv[3];

  ov::Tensor image = utils::load_image(image_path);

  ov::genai::Image2VideoPipeline pipe(models_path, "GPU");
  ov::Tensor video = pipe.generate(image, prompt).video;

  save_video("genai_video.avi", video);
}
Use CPU or GPU as devices without any other code change.
Additional Usage Options
Use Different Generation Parameters
Generation Configuration Workflow
- Get the model default config with
get_generation_config() - Modify parameters
- Apply the updated config using one of the following methods:
- Use
set_generation_config(config) - Pass config directly to
generate()(e.g.generate(prompt, config)) - Specify options as inputs in the
generate()method (e.g.generate(prompt, max_new_tokens=100))
- Use
Video Generation Configuration
You can adjust several parameters to control the video generation process, including dimensions and the number of inference steps:
- Python
- C++
import openvino_genai as ov_genai

pipe = ov_genai.Text2VideoPipeline(model_path, "CPU")
fps = 25
video = pipe.generate(
  prompt,
  width=512,
  height=512,
  num_videos_per_prompt=1,
  num_inference_steps=30,
  num_frames=161,
  guidance_scale=7.5,
  frame_rate=fps
).video

save_video("genai_video.avi", video, fps)
#include "openvino/genai/video_generation/text2video_pipeline.hpp"
#include "imwrite_video.hpp"

int main(int argc, char* argv[]) {
    const std::string models_path = argv[1], prompt = argv[2];

    ov::genai::Text2VideoPipeline pipe(models_path, "CPU");
    float fps = 25;
    ov::Tensor video = pipe.generate(
        prompt,
        ov::genai::width(512),
        ov::genai::height(512),
        ov::genai::num_videos_per_prompt(1),
        ov::genai::num_inference_steps(30),
        ov::genai::num_frames(161),
        ov::genai::guidance_scale(7.5f),
        ov::genai::frame_rate(fps)
    ).video;

    save_video("genai_video.avi", video, fps);
}
LTX-2 and LTX-2.3 Guidance Configuration
LTX-2 models generate video and audio jointly, so guidance can be tuned per modality with audio_guidance_scale and audio_guidance_rescale. Left unset, each takes the loaded model's own default: LTX-2.3 ships audio defaults that are independent of the video ones (audio_guidance_scale=7.0 against guidance_scale=3.0), while LTX-2 has none and falls back to its video counterpart. One consequence worth knowing: on LTX-2.3, guidance_scale=1.0 does not switch guidance off, because the audio scale still asks for it.
LTX-2.3 adds two further guidance terms, each costing one extra transformer pass per denoising step:
- Spatio-Temporal Guidance (STG) —
stg_scaleweighs a pass in which the transformer blocks listed inspatio_temporal_guidance_blockshave their self-attention perturbed. - Modality isolation —
modality_scaleweighs a pass with video-to-audio and audio-to-video cross attention disabled.
The pipeline picks its defaults from the converted model, so no configuration is needed to reproduce the reference behavior: LTX-2.3 starts with both terms enabled (stg_scale/audio_stg_scale at 1.0, modality_scale/audio_modality_scale at 3.0, spatio_temporal_guidance_blocks=[28]), while LTX-2 uses plain classifier-free guidance. To fall back to classifier-free guidance only, set all four scales to their disabling values — stg_scale=0.0, audio_stg_scale=0.0, modality_scale=1.0, audio_modality_scale=1.0. Zeroing only the video scales is not enough: a pass runs whenever either modality still asks for it.
- Python
- C++
import openvino_genai as ov_genai

pipe = ov_genai.Text2VideoPipeline(model_path, "CPU")
fps = 24
output = pipe.generate(
  prompt,
  guidance_scale=3.0,
  audio_guidance_scale=7.0,
  stg_scale=1.0,
  audio_stg_scale=1.0,
  modality_scale=3.0,
  audio_modality_scale=3.0,
  spatio_temporal_guidance_blocks=[28],
  frame_rate=fps
)

save_video("genai_video.avi", output.video, fps)
save_audio("genai_audio.wav", output.audio, output.audio_sample_rate)
#include "openvino/genai/video_generation/text2video_pipeline.hpp"
#include "imwrite_video.hpp"
#include "save_audio.hpp"

int main(int argc, char* argv[]) {
    const std::string models_path = argv[1], prompt = argv[2];

    ov::genai::Text2VideoPipeline pipe(models_path, "CPU");
    float fps = 24;
    ov::genai::VideoGenerationResult output = pipe.generate(
        prompt,
        ov::genai::guidance_scale(3.0f),
        ov::genai::audio_guidance_scale(7.0f),
        ov::genai::stg_scale(1.0f),
        ov::genai::audio_stg_scale(1.0f),
        ov::genai::modality_scale(3.0f),
        ov::genai::audio_modality_scale(3.0f),
        ov::genai::spatio_temporal_guidance_blocks(std::vector<int64_t>{28}),
        ov::genai::frame_rate(fps)
    );

    save_video("genai_video.avi", output.video, fps);
    save_audio("genai_audio.wav", output.audio, output.audio_sample_rate);
}
- These parameters apply to the LTX-2 family only. Passing them to an LTX-Video pipeline raises an exception rather than being silently ignored. On an LTX-2 model, whose exported Transformer has no guidance inputs,
stg_scaleandmodality_scalehave no effect. - Enabling Spatio-Temporal Guidance with an empty
spatio_temporal_guidance_blocksis an error: with no block to perturb, the extra pass would only cost time.
Working with LoRA Adapters
For video generation models like LTX-Video, LoRA adapters can modify the generation process to produce videos with specific artistic styles, content types, or quality enhancements.
Refer to the LoRA Adapters for more details on working with LoRA adapters.
negative_prompt: Negative prompt for video(s) generation.width: The width of resulting video(s).height: The height of resulting video(s).num_frames: Number of frames to generate for each video. Higher values produce longer videos but increase compute and memory.num_videos_per_prompt: Specifies how many video variations to generate in a single request for the same prompt.num_inference_steps: Defines denoising iteration count. Higher values increase quality and generation time, lower values generate faster with less detail.guidance_scale: Balances prompt adherence vs. creativity. Higher values follow prompt more strictly, lower values allow more creative freedom.guidance_rescale: Rescales the guided prediction towards the unguided one to counter overexposure.0.0disables rescaling.generator: Controls randomness for reproducible results. Same generator seed produces identical videos across runs.frame_rate: Target video FPS used by the pipeline.
LTX-2 family only:
audio_guidance_scale:guidance_scalefor the audio modality. Unset means the model's own default, which on LTX-2.3 is independent ofguidance_scale.audio_guidance_rescale:guidance_rescalefor the audio modality, resolved the same way.
LTX-2.3 only:
stg_scale: Weight of the Spatio-Temporal Guidance term.0.0disables it for the video modality.audio_stg_scale:stg_scalefor the audio modality.0.0disables it for the audio modality.spatio_temporal_guidance_blocks: Transformer block indices whose self-attention is perturbed by Spatio-Temporal Guidance. Indices outside the model's block range are ignored.modality_scale: Weight of the modality isolation term.<= 1.0disables it for the video modality.audio_modality_scale:modality_scalefor the audio modality.<= 1.0disables it for the audio modality.
Each pair shares one extra transformer pass, but a modality is guided only when its own scale is above the threshold, so you can guide one modality and leave the other untouched. The pass itself runs whenever either scale asks for it.
For the full list of generation parameters, refer to the Video Generation Config API.
Performance Metrics
Text2VideoPipeline returns VideoGenerationResult with a perf_metrics field (performance_stat in C++) of type VideoGenerationPerfMetrics, which inherits from ImageGenerationPerfMetrics.
Refer to the Image Generation Performance Metrics for details.