How to deploy the model and use demo in exportable code#
This guide explains how to deploy a model trained in the previous stage and visualize it outside of this repository. As a result of this step, you’ll get the exported model together with the self-contained python package and a demo application to visualize results in other environment without long installation process.
Note
To learn how to use demonstration mode inside this repository utilizing OTX CLI , refer to How to run the demonstration mode with OpenVINO™ Training Extensions CLI.
To be specific, this tutorial uses the object detection ATSS model trained and exported in the previuos step, which is located in outputs/openvino.
Nevertheless, it can be run for any task in the same manner.
Deployment#
1. Activate the virtual environment created in the previous step.
source .otx/bin/activate
2. otx deploy returns an openvino.zip
archive with the following files:
model
model.xmlandmodel.bin- model exported to the OpenVINO™ formatconfig.json- file containing the post-processing info and meta information about labels in the dataset
python
model_wrappers (Optional)
README.mdLICENSEdemo.py- simple demo to visualize results of model inferencerequirements.txt- minimal packages required to run the demo
3. You can deploy the model exported to IR, using the command below:
(otx) ...$ otx deploy src/otx/algorithms/detection/configs/detection/mobilenetv2_atss/template.yaml \
           --load-weights outputs/openvino/openvino.xml \
           --output outputs/deploy

2023-01-20 09:30:40,938 | INFO : Loading OpenVINO OTXDetectionTask
2023-01-20 09:30:41,736 | INFO : OpenVINO task initialization completed
2023-01-20 09:30:41,737 | INFO : Deploying the model
2023-01-20 09:30:41,753 | INFO : Deploying completed
You can also deploy the quantized model, that was optimized with NNCF or PTQ, passing the path to this model in IR format to --load-weights parameter.
After that, you can use the resulting openvino.zip archive in other application.
Demonstrarion#
Using the exported demo, we’re able to run the model in the demonstration mode outside of this repository, using only ported .zip archive with minimum required packages.
The demo allows to apply our model on the custom data or the online footage from a web camera and see how it will work in the real-life scenario.
1. Unzip the openvino.zip
archive.
unzip outputs/deploy/openvino.zip -d outputs/deploy/
2. To run the demo in exportable code, we can use a brand-new virtual environment, where we need to install a minimalistic set of packages required for inference only.
python3 -m venv demo_venv --prompt="demo"
source demo_venv/bin/activate
python -m pip install -r outputs/deploy/requirements.txt
3. The following line will run the demo on your input source,
using the model in the model folder. You can pass as input a single image, a folder of images, a video file, or a web camera id.
(demo) ...$ python outputs/deploy/python/demo.py --input docs/utils/images/wgisd_dataset_sample.jpg \
                                                  --models outputs/deploy/model
You can press Q to stop inference during the demo running.
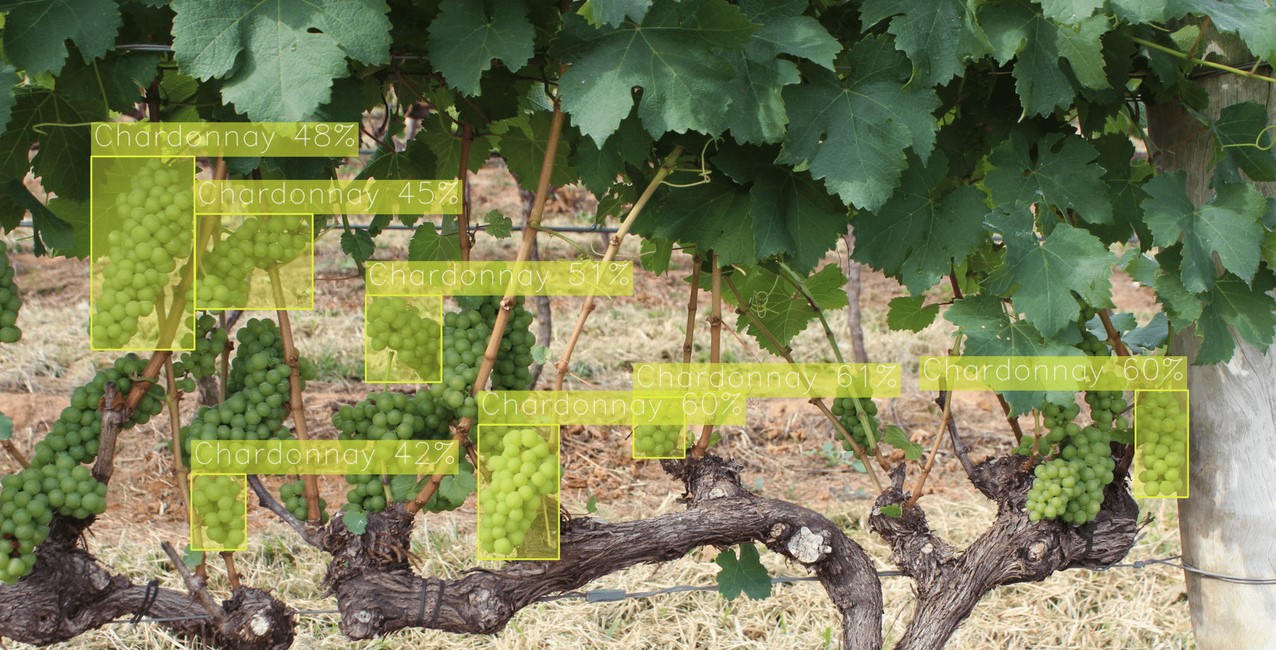
For example, the model inference on image from WGISD dataset, which we used for object detection training, will look like this:

Note
If you provide a single image as input, the demo processes and renders it quickly, then exits. To continuously
visualize inference results on the screen, apply the loop option, which enforces processing a single image in a loop.
In this case, you can stop the demo by pressing Q button or killing the process in the terminal (Ctrl+C for Linux).
To learn how to run the demo on Windows and MacOS, please refer to the outputs/deploy/python/README.md file in exportable code.
4. To save inferenced results with predictions on it, we can specify the folder path, using --output.
It works for images, videos, image folders and web cameras. To prevent issues, do not specify it together with a --loop parameter.
(demo) ...$ python outputs/deploy/python/demo.py --input docs/utils/images/wgisd_dataset_sample.jpg \
                                                  --models outputs/deploy/model \
                                                  --output resulted_images
5. To run a demo on a web camera, we need to know its ID. We can check a list of camera devices by running this command line on Linux system:
sudo apt-get install v4l-utils
v4l2-ctl --list-devices
The output will look like this:
Integrated Camera (usb-0000:00:1a.0-1.6):
    /dev/video0
After that, we can use this /dev/video0 as a camera ID for --input.
6. We can also change config.json that specifies the confidence threshold and
color for each class visualization, but any changes should be made with caution.
For example, in our image of the winery we see, that a lot of objects weren’t detected.
The original confidence threshold was chosen based on the validation split results to maximize the final F1 metric, balancing precision and recall values. So, visual results can be not suitable enough for a user.
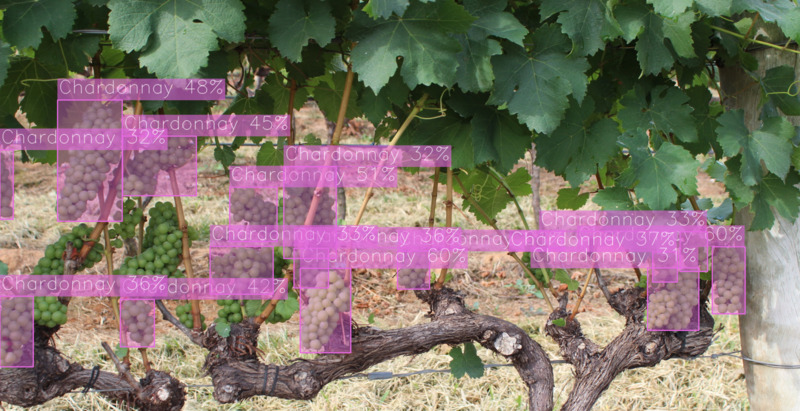
To overcome this problem, we can decrease confidence_threshold in config.json file from 0.4 to 0.3.
"model_parameters": {
    "result_based_confidence_threshold": true,
    "confidence_threshold": 0.3000000059604645,
For visual purposes, we can also update the color of Chardonnay class from yellow to lilac to make it more distinguishable.
"all_labels": {
    "0": {
        "_id": "0",
        "name": "Chardonnay",
        "color": {
            "red": 230,
             "green": 106,
             "blue": 226,
The result will be the following:

Note
Although this is example for object detection demo, other tasks can have their own tunable parameters that we can check in config.json file
Congratulations! Now you have learned how to use base OTX functionality. For the advanced features, please refer to the next section called Advanced Tutorials.
Troubleshooting#
1. If you have access to the Internet through the proxy server only, please use pip with a proxy call as demonstrated by the command below:
python -m pip install --proxy http://<usr_name>:<password>@<proxyserver_name>:<port#> <pkg_name>
2. If you use Anaconda environment, you should consider that OpenVINO has limited Conda support for Python 3.6 and 3.7 versions only. But the demo package requires python 3.8.
So please use other tools to create the environment (like venv or virtualenv) and use pip as a package manager.
3. If you have problems when you try to use pip install command,
please update the pip version by the following command:
python -m pip install --upgrade pip