CLI Guide#
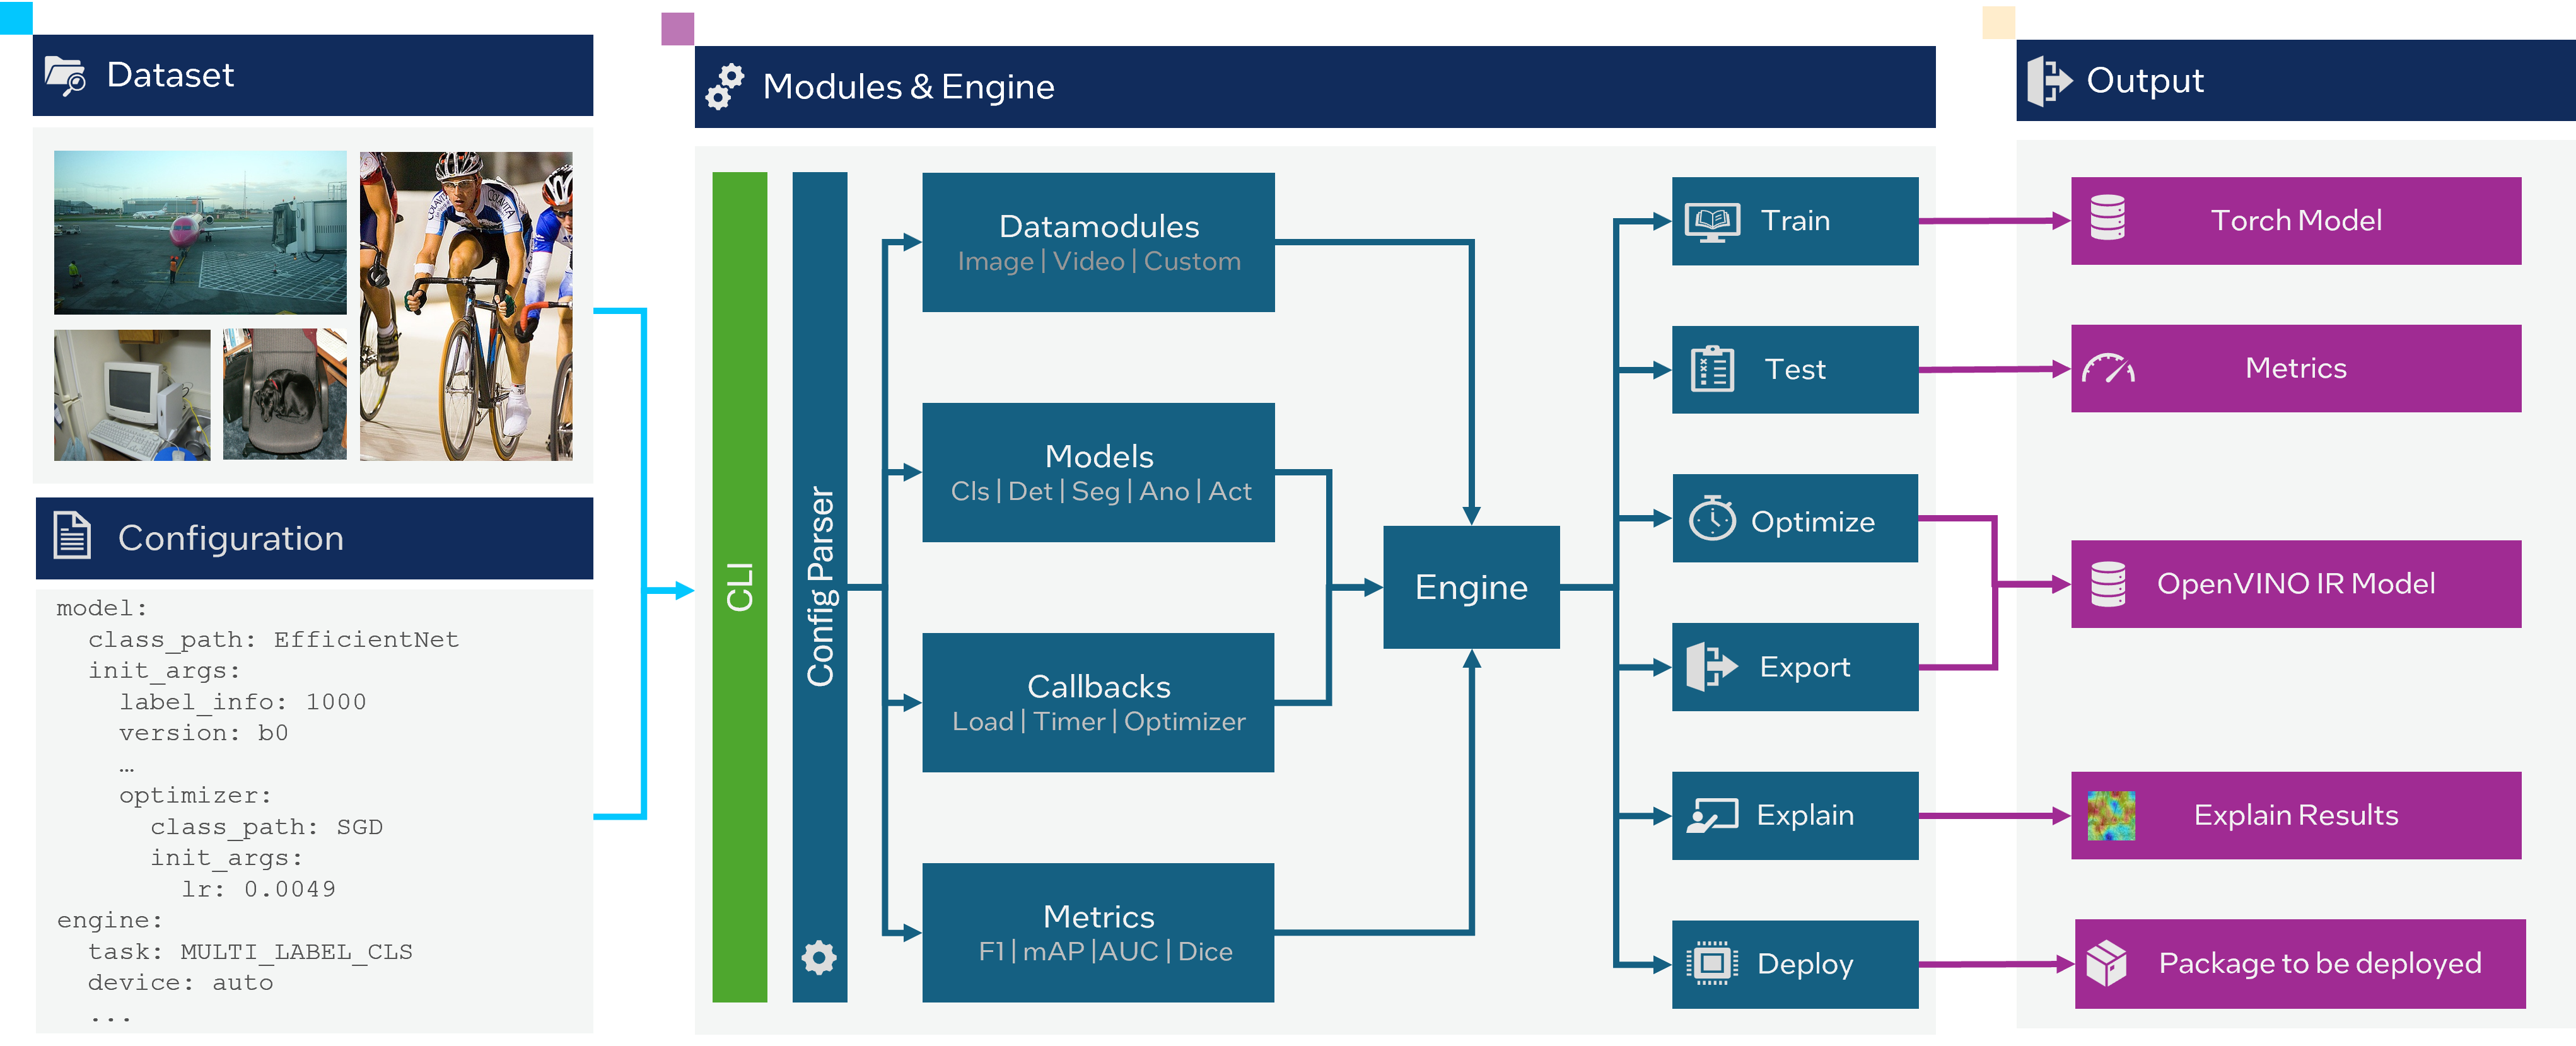
All possible OpenVINO™ Training Extensions CLI commands are presented below along with some general examples of how to run specific functionality. There are dedicated tutorials in our documentation with life-practical examples on specific datasets for each task.
Note
To run CLI commands you need to prepare a dataset. Each task requires specific data formats. To know more about which formats are supported by each task, refer to explanation section in the documentation. Also, by default, the OpenVINO™ Training Extensions CLI is written using jsonargparse, see jsonargparse or LightningCLI. Please refer Jsonargparse Documentation
Help#
otx --help show available sub-commands.
(otx) ...$ otx --help
╭─ Arguments ─────────────────────────────────────────────────────────────────────────────────────────────────────╮
│ Usage: otx [-h] [-v] {find,train,test,predict,export,optimize,explain} ...                              │
│                                                                                                                 │
│                                                                                                                 │
│ OpenVINO Training-Extension command line tool                                                                   │
│                                                                                                                 │
│                                                                                                                 │
│ Options:                                                                                                        │
│   -h, --help            Show this help message and exit.                                                        │
│   -v, --version         Display OTX version number.                                                             │
│                                                                                                                 │
│ Subcommands:                                                                                                    │
│   For more details of each subcommand, add it as an argument followed by --help.                                │
│                                                                                                                 │
│                                                                                                                 │
│   Available subcommands:                                                                                        │
│     find                This shows the model provided by OTX.                                                   │
│     train               Trains the model using the provided LightningModule and OTXDataModule.                  │
│     test                Run the testing phase of the engine.                                                    │
│     predict             Run predictions using the specified model and data.                                     │
│     export              Export the trained model to OpenVINO Intermediate Representation (IR) or ONNX formats.  │
│     optimize            Applies NNCF.PTQ to the underlying models (now works only for OV models).               │
│     explain             Run XAI using the specified model and data (test subset).                               │
|     benchmark           Executes model micro benchmarking on random data.                                       |
│                                                                                                                 │
╰─────────────────────────────────────────────────────────────────────────────────────────────────────────────────╯
The subcommand can get help output in the following way. For basic subcommand help, the Verbosity Level is 0. In this case, the CLI provides a Quick-Guide in markdown.
(otx) ...$ otx train --help
┏━━━━━━━━━━━━━━━━━━━━━━━━━━━━━━━━━━━━━━━━━━━━━━━━━━━━━━━━━━━━━━━━━━━━━━━┓
┃                OpenVINO™ Training Extensions CLI Guide                ┃
┗━━━━━━━━━━━━━━━━━━━━━━━━━━━━━━━━━━━━━━━━━━━━━━━━━━━━━━━━━━━━━━━━━━━━━━━┛

Github Repository:
https://github.com/openvinotoolkit/training_extensions.

A better guide is provided by the documentation.
╭─ Quick-Start ─────────────────────────────────────────────────────────╮
│                                                                       │
│  1 you can train with data_root only. then OTX will provide default   │
│    model.                                                             │
│                                                                       │
│                                                                       │
│  otx train --data_root <DATASET_PATH>                                 │
│                                                                       │
│                                                                       │
│  2 you can pick a model or datamodule as Config file or Class.        │
│                                                                       │
│                                                                       │
│  otx train                                                            │
│  --data_root <DATASET_PATH>                                           │
│  --model <CONFIG | CLASS_PATH_OR_NAME> --data <CONFIG |               │
│  CLASS_PATH_OR_NAME>                                                  │
│                                                                       │
│                                                                       │
│  3 Of course, you can override the various values with commands.      │
│                                                                       │
│                                                                       │
│  otx train                                                            │
│  --data_root <DATASET_PATH>                                           │
│  --max_epochs <EPOCHS, int> --checkpoint <CKPT_PATH, str>             │
│                                                                       │
│                                                                       │
│  4 If you have a complete configuration file, run it like this.       │
│                                                                       │
│                                                                       │
│  otx train --data_root <DATASET_PATH> --config <CONFIG_PATH, str>     │
│                                                                       │
│                                                                       │
│ To get more overridable argument information, run the command below.  │
│                                                                       │
│                                                                       │
│  # Verbosity Level 1                                                  │
│  otx train [optional_arguments] -h -v                                 │
│  # Verbosity Level 2                                                  │
│  otx train [optional_arguments] -h -vv                                │
│                                                                       │
╰───────────────────────────────────────────────────────────────────────╯
For Verbosity Level 1, it shows Quick-Guide & the essential arguments.
(otx) ...$ otx train --help -v
┏━━━━━━━━━━━━━━━━━━━━━━━━━━━━━━━━━━━━━━━━━━━━━━━━━━━━━━━━━━━━━━━━━━━━━━━┓
┃                OpenVINO™ Training Extensions CLI Guide                ┃
┗━━━━━━━━━━━━━━━━━━━━━━━━━━━━━━━━━━━━━━━━━━━━━━━━━━━━━━━━━━━━━━━━━━━━━━━┛

Github Repository:
https://github.com/openvinotoolkit/training_extensions.

A better guide is provided by the documentation.
╭─ Quick-Start ─────────────────────────────────────────────────────────╮
│  ...                                                                  │
╰───────────────────────────────────────────────────────────────────────╯
╭─ Arguments ─────────────────────────────────────────────────────────────────────────────────────╮
│ Usage: otx [options] train [-h] [-c CONFIG] [--print_config [=flags]]                           │
│                            [--data_root DATA_ROOT] [--task TASK]                                │
│                            [--engine CONFIG]                                                    │
│                            [--work_dir WORK_DIR]                                                │
│                            [--engine.checkpoint CHECKPOINT]                                     │
│                            [--engine.device {auto,gpu,cpu,tpu,ipu,hpu,mps}]                     │
│                            [--model.help CLASS_PATH_OR_NAME]                                    │
│                            [--model CONFIG | CLASS_PATH_OR_NAME | .INIT_ARG_NAME VALUE]         │
│                            [--data CONFIG]                                                      │
│                            [--optimizer CONFIG | CLASS_PATH_OR_NAME | .INIT_ARG_NAME VALUE]     │
│                            [--scheduler CONFIG | CLASS_PATH_OR_NAME | .INIT_ARG_NAME VALUE]     │
│                                                                                                 │
...
For Verbosity Level 2, it shows all available arguments.
(otx) ...$ otx train --help -vv
print_config#
Preview all configuration values that will be executed through that command line.
(otx) ...$ otx train --config <config-file-path> --print_config
data_root: tests/assets/car_tree_bug
callback_monitor: val/map_50
engine:
  task: DETECTION
  work_dir: ./otx-workspace
  device: auto
model:
class_path: otx.algo.detection.atss.ATSS
init_args:
    label_info: 80
    model_name: atss_mobilenetv2
optimizer: ...
scheduler: ...
data:
  task: DETECTION
  config:
    data_format: coco_instances
    train_subset: ...
    val_subset: ...
    test_subset: ...
    mem_cache_size: 1GB
    mem_cache_img_max_size: null
    image_color_channel: RGB
    include_polygons: false
max_epochs: 2
deterministic: false
precision: 16
callbacks: ...
logger: ...
Users can also pre-generate a config file with an example like the one below.
(otx) ...$ otx train --config <config-file-path> --print_config > config.yaml
Find#
otx find lists model templates and backbones available for the given task. Specify the task name with --task option. Use --pattern to find the model name from OpenVINO™ Training Extensions.
(otx) ...$ otx find --help
╭─ Arguments ───────────────────────────────────────────────────────────────────────────────────────────────────────────────────────────────────────────────────────────────────────────────╮
│ Usage: otx [options] find [-h]                                                                                                                                                            │
│                           [--task --task {ANOMALY,ANOMALY_CLASSIFICATION,ANOMALY_DETECTION,ANOMALY_SEGMENTATION,MULTI_CLASS_CLS,MULTI_LABEL_CLS,H_LABEL_CLS,                              │
│                                            DETECTION,ROTATED_DETECTION,KEYPOINT_DETECTION,INSTANCE_SEGMENTATION,SEMANTIC_SEGMENTATION,VISUAL_PROMPTING}                                   │
│                           [--pattern PATTERN]                                                                                                                                             │
│                                                                                                                                                                                           │
│                                                                                                                                                                                           │
│ Options:                                                                                                                                                                                  │
│   -h, --help            Show this help message and exit.                                                                                                                                  │
│   --task {ANOMALY,ANOMALY_CLASSIFICATION,ANOMALY_DETECTION,ANOMALY_SEGMENTATION,MULTI_CLASS_CLS,MULTI_LABEL_CLS,H_LABEL_CLS,                                                              │
│            DETECTION,ROTATED_DETECTION,KEYPOINT_DETECTION,INSTANCE_SEGMENTATION,SEMANTIC_SEGMENTATION},                                                                                   │
│                         Value for filtering by task. Default is None, which shows all recipes. (type: None, default: None)                                                                │
│   --pattern PATTERN     This allows you to filter the model name of the recipe. For example, if you want to find all models that contain the word 'efficient', you can use '--pattern     │
│                         efficient' (type: None, default: None)                                                                                                                            │
│                                                                                                                                                                                           │
╰───────────────────────────────────────────────────────────────────────────────────────────────────────────────────────────────────────────────────────────────────────────────────────────╯
Example to find ready-to-use recipes for the detection task:
(otx) ...$ otx find --task DETECTION
┏━━━━━━━━━━━┳━━━━━━━━━━━━━━━━━━━━━━━┳━━━━━━━━━━━━━━━━━━━━━━━━━━━━━━━━━━━━━━━━━━━━━━━━━━━━━━━━━━━━━━━━━━━━━━━━━━┓
┃ Task      ┃ Model Name            ┃ Recipe Path                                                              ┃
┡━━━━━━━━━━━╇━━━━━━━━━━━━━━━━━━━━━━━╇━━━━━━━━━━━━━━━━━━━━━━━━━━━━━━━━━━━━━━━━━━━━━━━━━━━━━━━━━━━━━━━━━━━━━━━━━━┩
│ DETECTION │ yolox_l               │ /home/kprokofi/otx_2/src/otx/recipe/detection/yolox_l.yaml               │
│ DETECTION │ rtdetr_18             │ /home/kprokofi/otx_2/src/otx/recipe/detection/rtdetr_18.yaml             │
│ DETECTION │ rtdetr_101_tile       │ /home/kprokofi/otx_2/src/otx/recipe/detection/rtdetr_101_tile.yaml       │
│ DETECTION │ atss_resnext101_tile  │ /home/kprokofi/otx_2/src/otx/recipe/detection/atss_resnext101_tile.yaml  │
│ DETECTION │ ssd_mobilenetv2       │ /home/kprokofi/otx_2/src/otx/recipe/detection/ssd_mobilenetv2.yaml       │
│ DETECTION │ rtmdet_tiny_tile      │ /home/kprokofi/otx_2/src/otx/recipe/detection/rtmdet_tiny_tile.yaml      │
│ DETECTION │ rtdetr_50             │ /home/kprokofi/otx_2/src/otx/recipe/detection/rtdetr_50.yaml             │
│ DETECTION │ ssd_mobilenetv2_tile  │ /home/kprokofi/otx_2/src/otx/recipe/detection/ssd_mobilenetv2_tile.yaml  │
│ DETECTION │ yolox_x_tile          │ /home/kprokofi/otx_2/src/otx/recipe/detection/yolox_x_tile.yaml          │
│ DETECTION │ yolox_l_tile          │ /home/kprokofi/otx_2/src/otx/recipe/detection/yolox_l_tile.yaml          │
│ DETECTION │ rtmdet_tiny           │ /home/kprokofi/otx_2/src/otx/recipe/detection/rtmdet_tiny.yaml           │
│ DETECTION │ yolox_s               │ /home/kprokofi/otx_2/src/otx/recipe/detection/yolox_s.yaml               │
│ DETECTION │ yolox_x               │ /home/kprokofi/otx_2/src/otx/recipe/detection/yolox_x.yaml               │
│ DETECTION │ dfine_x_tile          │ /home/kprokofi/otx_2/src/otx/recipe/detection/dfine_x_tile.yaml          │
│ DETECTION │ yolox_tiny_tile       │ /home/kprokofi/otx_2/src/otx/recipe/detection/yolox_tiny_tile.yaml       │
│ DETECTION │ atss_mobilenetv2      │ /home/kprokofi/otx_2/src/otx/recipe/detection/atss_mobilenetv2.yaml      │
│ DETECTION │ yolox_s_tile          │ /home/kprokofi/otx_2/src/otx/recipe/detection/yolox_s_tile.yaml          │
│ DETECTION │ yolox_tiny            │ /home/kprokofi/otx_2/src/otx/recipe/detection/yolox_tiny.yaml            │
│ DETECTION │ rtdetr_50_tile        │ /home/kprokofi/otx_2/src/otx/recipe/detection/rtdetr_50_tile.yaml        │
│ DETECTION │ openvino_model        │ /home/kprokofi/otx_2/src/otx/recipe/detection/openvino_model.yaml        │
│ DETECTION │ rtdetr_101            │ /home/kprokofi/otx_2/src/otx/recipe/detection/rtdetr_101.yaml            │
│ DETECTION │ atss_resnext101       │ /home/kprokofi/otx_2/src/otx/recipe/detection/atss_resnext101.yaml       │
│ DETECTION │ dfine_x               │ /home/kprokofi/otx_2/src/otx/recipe/detection/dfine_x.yaml               │
│ DETECTION │ rtdetr_18_tile        │ /home/kprokofi/otx_2/src/otx/recipe/detection/rtdetr_18_tile.yaml        │
│ DETECTION │ atss_mobilenetv2_tile │ /home/kprokofi/otx_2/src/otx/recipe/detection/atss_mobilenetv2_tile.yaml │
└───────────┴───────────────────────┴──────────────────────────────────────────────────────────────────────────┘
Example to find yolo named model for the detection task:
(otx) ...$ otx find --task DETECTION --pattern 'yolo*'
┏━━━━━━━━━━━┳━━━━━━━━━━━━━━━━━┳━━━━━━━━━━━━━━━━━━━━━━━━━━━━━━━━━━━━━━━┓
┃ Task      ┃ Model Name      ┃ Recipe Path                           ┃
┡━━━━━━━━━━━╇━━━━━━━━━━━━━━━━━╇━━━━━━━━━━━━━━━━━━━━━━━━━━━━━━━━━━━━━━━┩
│ DETECTION │ yolox_tiny      │ recipe/detection/yolox_tiny.yaml      │
│ DETECTION │ yolox_x         │ recipe/detection/yolox_x.yaml         │
│ DETECTION │ yolox_l_tile    │ recipe/detection/yolox_l_tile.yaml    │
│ DETECTION │ yolox_s         │ recipe/detection/yolox_s.yaml         │
│ DETECTION │ yolox_l         │ recipe/detection/yolox_l.yaml         │
│ DETECTION │ yolox_x_tile    │ recipe/detection/yolox_x_tile.yaml    │
│ DETECTION │ yolox_s_tile    │ recipe/detection/yolox_s_tile.yaml    │
│ DETECTION │ yolox_tiny_tile │ recipe/detection/yolox_tiny_tile.yaml │
└───────────┴─────────────────┴───────────────────────────────────────┘
Dataset handling#
If the train dataset root and validation dataset root are the same - pass the same path to both options. For example, you have a standard COCO format for object detection:
coco_data_root
  |---- annotations
    |---- instances_train.json
    |---- instances_val.json
  |---- images
    |---- train
      |---- 000.jpg
      ....
  |---- val
      |---- 000.jpg
      ....
Then pass the path to coco_data_root to both root options:
--data_root coco_data_root
Training#
otx train trains a model (a particular model recipe) on a dataset:
The results will be saved in ./otx-workspace/ folder by default. The output folder can be modified by --work_dir option.
otx train receives --config as a argument. config can be a path to the specific *.yaml file. Also, the path to data root should be passed to the CLI to start training.
Example of the command line to start training using Auto-Configuration:
(otx) ...$ otx train --data_root <dataset-root> --task <TASK>
You can use the recipe configuration provided by OpenVINO™ Training Extensions. The corresponding configuration file can be found via otx find.
(otx) ...$ otx train --config <config-file-path> --data_root <dataset-root>
You can also use a custom model and data module. The model and data module can be passed as a class path or a configuration file.
(otx) ...$ otx train --model <model-class-path-or-name> --task <task-type> --data_root <dataset-root>
For example, if you want to use the otx.algo.classification.torchvision_model.TVModelForMulticlassCls model class, you can train it as shown below.
(otx) ...$ otx train --model otx.algo.classification.torchvision_model.TVModelForMulticlassCls --model.backbone mobilenet_v3_small ...
Note
You also can visualize the training using Tensorboard as these logs are located in <work_dir>/tensorboard.
Note
--data.mem_cache_size provides in-memory caching for decoded images in main memory.
If the batch size is large, such as for classification tasks, or if your dataset contains high-resolution images,
image decoding can account for a non-negligible overhead in data pre-processing.
This option can be useful for maximizing GPU utilization and reducing model training time in those cases.
If your machine has enough main memory, we recommend increasing this value as much as possible.
For example, you can cache approximately 10,000 of 500x375~500x439 sized images with --data.mem_cache_size 8GB.
It is also possible to start training by omitting the recipe and just passing the paths to dataset roots, then the auto-configuration will be enabled. Based on the dataset, OpenVINO™ Training Extensions will choose the task type and recipe with the best accuracy/speed trade-off.
You can override the configurable arguments. For example, that is how you can change the max epochs and the batch size for the training:
(otx) ...$ otx train ... --data.train_subset.batch_size <batch-size> --max_epochs <max-epochs>
Note
train, test works based on lightning.Tranier. You can change the Trainer component with the arguments of train and test. You can find more arguments in this documentation.
Trainer
Exporting#
otx export exports a trained model to the OpenVINO™ IR format to efficiently run it on Intel hardware.
The command below performs exporting to the {work_dir}/ path.
(otx) ...$ otx export ... --checkpoint <path/to/trained/weights.ckpt>
The command results in exported_model.xml, exported_model.bin.
To use the exported model as an input for otx explain, please dump additional outputs with internal information, using --explain:
(otx) ...$ otx export ... --checkpoint <path/to/trained/weights.ckpt> --explain True
Note
If .latest exists in work_dir, you can omit checkpoint and config.
You can also omit --work_dir if you run from the root of the workspace that contains .latest.
(otx) ...$ otx export --work_dir <workspace-path>

# OR if you are in the workspace root
(otx) ...$ otx export
Optimization#
otx optimize optimizes a model using PTQ depending on the model and transforms it to INT8 format.
PTQ optimization used for models exported in the OpenVINO™ IR format
Command example for optimizing OpenVINO™ model (.xml) with OpenVINO™ PTQ:
(otx) ...$ otx optimize ... --checkpoint <path/to/exported_model.xml> \
                            --data_root <path/to/val/root>
Thus, to use PTQ pass the path to exported IR (.xml) model.
Note
If .latest exists in work_dir, you can omit checkpoint and config.
You can also omit --work_dir if you run from the root of the workspace that contains .latest.
(otx) ...$ otx optimize --work_dir <workspace-path>

# OR if you are in the workspace root
(otx) ...$ otx optimize
Evaluation#
otx test runs the evaluation of a model on the specific dataset.
The command below will evaluate the trained model on the provided dataset:
(otx) ...$ otx test ... --data_root <path/to/test/root> \
                        --checkpoint <path/to/model_weghts>
Note
It is possible to pass both PyTorch weights .ckpt or OpenVINO™ IR exported_model.xml to --checkpoint option.
Note
If .latest exists in work_dir, you can omit checkpoint and config.
You can also omit --work_dir if you run from the root of the workspace that contains .latest.
(otx) ...$ otx test --work_dir <workspace-path>

# OR if you are in the workspace root
(otx) ...$ otx test
Explanation#
otx explain runs the explainable AI (XAI) algorithm on a specific model-dataset pair. It helps explain the model’s decision-making process in a way that is easily understood by humans.
The command below will generate saliency maps (heatmaps with red colored areas of focus) of the trained model on the provided dataset and save the resulting images to output path:
(otx) ...$ otx explain --config <path/to/config> \
                       --checkpoint <path/to/model_weights>
Note
It is possible to pass both PyTorch weights .ckpt or OpenVINO™ IR exported_model.xml to --checkpoint option.
By default, the model is exported to the OpenVINO™ IR format without extra feature information needed for the explain function. To use OpenVINO™ IR model in otx explain, please first export it with --explain parameter:
(otx) ...$ otx export ... --checkpoint <path/to/trained/weights.ckpt> \
                          --explain True
(otx) ...$ otx explain ... --checkpoint outputs/openvino/with_features \
Micro-benchmarking#
otx benchmark tool allows performing a fast in-place benchmarking on randomly generated data. The benchmark excludes data loading cost, but takes into account extra burden of OTX API and ModelAPI (in case of OpenVINO™ IR models).
The command requires checkpoint path for OpenVINO™ IR models. In case of torch models, this parameter is optional. Also, for torch model number of trainable parameters and theoretical computational complexity are estimated when model’s structure allows that. It worth noticing that the latency and throughput are depend on batch size. Varying the batch size parameter, one can quickly explore the trade-off for the considered model. For OpenVINO™ IR models batching is imitated by using async inference API.
(otx) ...$ otx benchmark ... --data_root <path/to/test/root> \
                             --checkpoint <path/to/model_weights> \
                             --batch_size 1
Note
It is possible to pass both PyTorch weights .ckpt or OpenVINO™ IR exported_model.xml to --checkpoint option.
Workspace#
If we run a typical Training example, will have a folder like the one below as output.
otx-workspace/
    .latest/                      # Gather the most recent information.
        train/                    # Link to the output_dir where the most recent train was performed.
        export/                   # Link to the output_dir where the most recent export was performed.
        .../
    20240000_000000/              # Deliverables from OTX CLI
    20240000_000001/              # Deliverables from OTX CLI Second-Trial
OpenVINO™ Training Extensions considers the folder with .latest to be the root of the entire Workspace.
.latest soft-links to the most recently trained output folder.
Case 1: If a user specifies an output work_dir (An already existing workspace)
(otx) ...$ otx train --work_dir otx-workspace
This will then use the .latest in the otx-workspace for training.
Case 2: if a user executes a command from within the otx-workspace
cd otx-workspace

(otx) ...$ otx train                         # Behave in the same way as the first training
(otx) ...$ otx test                          # Perform a test with the config and checkpoint from the last training baseline.
(otx) ...$ otx export                        # Perform a export with the config and checkpoint from the last training baseline.